

Okay, so picture this: a rainy Sunday afternoon, I'm craving something sweet but also, like, easy. My usual tiramisu recipe felt a bit... fancy. Then, a lightbulb moment! What if I swapped ladyfingers for Oreos? Honestly, it was a total game-changer. The first bite of this Oreo Tiramisu was pure magic. My husband, who's usually a tough critic, went back for seconds, then thirds! It's become our go-to for potlucks and lazy weekends. Seriously, you have to try it.
Oh, the first time I made this, I was so excited, I totally forgot to let the coffee cool! I dipped the Oreos in hot coffee, and well, they basically disintegrated into a sad, mushy mess. Oops! Had to restart that layer, but hey, that's how you learn, right? Now, I always brew my coffee first thing so it has plenty of time to chill before I even think about starting my Oreo Tiramisu assembly.
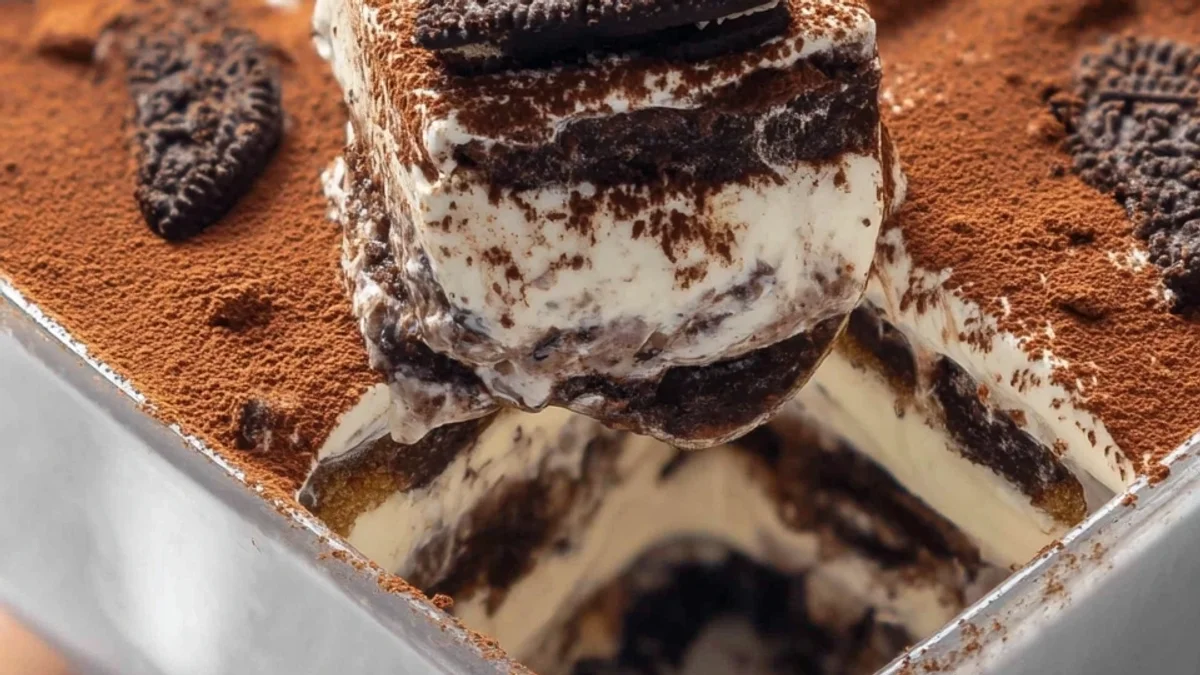
What You'll Need for Your Dreamy Oreo Tiramisu
- 24 Oreo cookies, divided: These are the star of our show, hon! We're talking 24 cookies, some for crushing into a delightful base, others for those irresistible layers. Don't skimp on these, they bring that iconic chocolatey crunch and flavor that makes this Oreo Tiramisu so special. I usually sneak a few while I'm crushing them, shhh!
- 16 ounces mascarpone cheese, softened: Mascarpone is where that luxurious, rich creaminess comes from. Seriously, it's the heart of any good tiramisu. Make sure it's softened, or you'll end up with lumps, and nobody wants lumpy cream. It makes the filling so smooth and decadent, almost like a cloud. Just trust me on this one, it's worth every penny.
- 8 ounces cream cheese, softened: Now, adding cream cheese might seem a little unconventional for tiramisu, but it's my secret weapon here. It adds a lovely tang and helps stabilize the filling, giving it a bit more structure, especially with those heavy Oreos. Plus, it just makes the whole thing feel extra comforting and rich. Soften it alongside the mascarpone for a seamless blend.
- 1 1/2 cups heavy cream, cold: This is what gives our filling that light, airy, whipped texture. It needs to be cold, like, straight from the fridge cold. If it's warm, it just won't whip up properly, and you'll be sad. I've had many a 'cream won't whip' disaster, so learn from my mistakes! It creates the perfect fluffy complement to the dense Oreos.
- 1 cup strong brewed coffee, cooled: The coffee infusion is non-negotiable for that classic tiramisu flavor, even in an Oreo version! Strong is key I usually make espresso or a super strong French press. And cooled is vital, remember my anecdote? It softens the Oreos just enough without turning them to mush. You want that perfect balance of coffee kick and chocolatey goodness for our Oreo Tiramisu.
- 1/4 cup unsweetened cocoa powder, for dusting: That final dusting of cocoa? It's not just for looks, though it does make it look super fancy! It adds a touch of bittersweetness that cuts through the rich cream and sweet Oreos. It's the perfect finishing touch, a little kiss of chocolate that makes every bite feel complete. Don't skip this last step, it's so important for the overall flavor profile.
Bringing Your Oreo Tiramisu to Life: Step-by-Step Guide
- Step 1: Prepare Coffee Mixture:
- First things first, get that coffee brewing! You want it strong, hon. Think espresso or a really dark roast. Once it's brewed, pour it into a shallow dish and let it chill out completely. If you're using coffee liqueur, stir it in now. This is where the magic starts for soaking those Oreos for our Oreo Tiramisu, giving them that signature coffee kiss without turning them into a hot mess. Patience is a virtue here!
- Step 2: Whip Cream Filling:
- Now for the dreamy filling! In a big bowl, beat together your softened mascarpone, cream cheese, powdered sugar, vanilla, and salt until it's super smooth. Then, in a separate, cold bowl, whip your heavy cream until it forms stiff peaks. Gently fold that whipped cream into your cheese mixture. Be gentle, we want it airy and luscious, the perfect cloud-like layer for your Oreo Tiramisu.
- Step 3: Crush Oreo Base:
- Time to get a little aggressive! Take about 12 of your Oreos and crush them up. You can use a food processor for a fine crumb or a ziplock bag and a rolling pin for a more rustic texture. I love the rolling pin method, it's therapeutic! This crushed layer forms the beautiful, chocolatey base of your dessert. It's the foundation for all that creamy goodness that's coming.
- Step 4: Assemble First Layer:
- Alright, let's build this beauty! Spread about half of your crushed Oreos evenly in the bottom of your serving dish. Now, take the remaining whole Oreos, quickly dip each one (just a second or two!) into your cooled coffee mixture, and arrange them over the crushed base. This coffee-soaked layer is crucial for the classic tiramisu feel in our Oreo Tiramisu.
- Step 5: Add Second Layer:
- Once your coffee-soaked Oreos are in place, scoop about half of your glorious cream filling right over them. Spread it out gently to cover everything. Then, repeat the whole thing! Another layer of coffee-dipped Oreos, followed by the rest of that luscious cream. You're almost there! This layering is what makes the Oreo Tiramisu so visually appealing and delicious with every bite.
- Step 6: Chill and Garnish:
- This is the hardest part: waiting! Cover your masterpiece and pop it into the fridge for at least 4 hours, or even better, overnight. That chilling time lets all those flavors meld together and the cream set up beautifully. Before serving, dust generously with unsweetened cocoa powder. It's the perfect finishing touch, adding a little bittersweet magic to your incredible dessert.
Making this dessert always feels like a little kitchen dance. There's the satisfying rhythm of beating the cream, the gentle folding, and that moment of pure joy when you layer everything just so. It's a recipe that lets you get your hands a little dirty but rewards you with something so incredibly beautiful and delicious. It's truly a happy place in my kitchen, every single time.
Keeping Your Oreo Tiramisu Fresh and Fabulous
Okay, so you've got leftover Oreo Tiramisu? Lucky you! This dessert actually tastes even better the next day, once all those flavors have really had a chance to mingle. Just make sure you cover it tightly with plastic wrap before popping it back in the fridge. I once left it uncovered, and it totally absorbed some weird fridge smells lesson learned! It'll stay fresh and delicious for up to 3-4 days in the refrigerator. Don't try to freeze it, though. The cream cheese and mascarpone can get a bit grainy when thawed, and the Oreos turn mushy. Trust me, I've tried, and it was a textural tragedy.

Making Your Oreo Tiramisu Your Own: Ingredient Swaps
Feeling adventurous? I've played around with a few swaps for this Oreo Tiramisu. If you're not a coffee fan, you can totally use warm milk mixed with a teaspoon of vanilla extract, or even hot chocolate! For the coffee liqueur, feel free to skip it or swap it for a splash of rum or even a little Bailey's for an extra boozy kick. If you can't find mascarpone, a mix of cream cheese and heavy cream (about 2:1 ratio) can work in a pinch, though the texture won't be quite as rich. And hey, if you're out of Oreos (gasp!), any similar chocolate sandwich cookie would do. Get creative, make it your own!
Ideas for Serving Up Your Irresistible Oreo Tiramisu
This dessert is a showstopper all on its own, but a few little touches can make it even more special. I love serving it in clear glass dishes so you can see all those beautiful layers. A dollop of extra whipped cream on top is never a bad idea, especially if you want to get super fancy. For a little something extra, you could shave some dark chocolate over the top alongside the cocoa dusting. It's also fantastic with a hot cup of coffee (decaf if it's evening!) or a rich dessert wine. It’s perfect for a dinner party, a birthday, or just a Tuesday when you need a little pick-me-up.
The Sweet History Behind This Oreo Tiramisu Twist
Tiramisu, the OG, means 'pick me up' in Italian, supposedly because of the coffee and sugar boost. It's a classic for a reason, right? Layers of coffee-soaked ladyfingers and a rich mascarpone cream. But let's be real, sometimes you just want something a little more... fun, a little more you. That's where this Oreo Tiramisu comes in! It takes that beloved Italian tradition and gives it a distinctly American, playful twist with those iconic chocolate cookies. It's a fusion that just works, blending the elegance of Italy with the comfort of a childhood favorite. It’s my kind of culinary history!
Honestly, this Oreo Tiramisu has brought so much joy to my kitchen and my family. It’s simple, it’s decadent, and it’s truly a little slice of heaven. I hope you love making it and, more importantly, eating it, as much as I do. Don't be shy, give it a try this weekend and tell me all about your experience in the comments below! Happy baking (or, well, no-baking)!

All Your Burning Questions About Oreo Tiramisu, Answered!
- Can I make Oreo Tiramisu ahead of time?
Oh, absolutely! In fact, it's encouraged. Making your Oreo Tiramisu a day in advance lets all those amazing flavors deepen and the layers set up perfectly. Just cover it tightly and chill it overnight. It’ll be even more delicious, trust me!
- What if I don't drink coffee?
No problem at all, hon! You can swap the strong brewed coffee for warm milk mixed with a teaspoon of vanilla extract. Or, for a fun twist, try using hot chocolate or even a chocolate milk for dipping. The cookies will still soften beautifully.
- Can I use low-fat ingredients?
I wouldn't recommend it, hon. The mascarpone and heavy cream are essential for that rich, luscious texture. Low-fat versions just won't give you the same decadent mouthfeel, and the filling might not set up as well. Stick to the full-fat for the best results!
- How do I prevent my Oreos from getting too soggy?
The key is a quick dip! Seriously, a second or two per cookie is all you need. You want them just softened, not disintegrating. Also, make sure your coffee is completely cooled. Warm coffee will turn them into mush much faster. Learn from my early mistakes!
- Is this dessert kid-friendly?
It totally depends on the coffee and liqueur! If you omit the coffee liqueur and use decaf coffee, or even milk as the dipping liquid, it's super kid-friendly. My nieces and nephews devour the non-alcoholic version. It's a fun, creamy, chocolatey treat for everyone!