

Okay, so picture this: a chilly autumn afternoon, leaves crunching, and me, craving something warm and cozy. I grew up on fried apple fritters from the local bakery, but my kitchen always ended up smelling like a deep fryer for days. One year, I stumbled upon a recipe for Baked Apple Fritters, and honestly, it changed everything! The smell of cinnamon and apples baking? Pure magic. It was a game-changer for my sweet tooth and my kitchen's air quality, to be real. This recipe brings back all those warm, fuzzy fall feelings without the mess. You're gonna love it!
Oh, the first time I made these Baked Apple Fritters, I was so excited, I forgot to peel the apples! Yep, crunchy little bits of peel in every bite. My husband, bless his heart, tried to be polite, but the look on his face said it all. Oops! Lesson learned: always, always peel your Granny Smiths. It was a comical disaster, but hey, we still ate them, just with a bit more… fiber.
Baked Apple Fritters: What You'll Need to Make Them
- 2 cups all-purpose flour: This is your foundation, your trusty base! I've tried using whole wheat flour once, thinking I was being super healthy, but the texture was just off. It ended up being a bit too dense for these light and airy fritters. Stick with the all-purpose, hon, it gives these Baked Apple Fritters that perfect, fluffy bite we're aiming for. It's the unsung hero, really, holding all that apple-y goodness together.
- 1/2 cup granulated sugar: Sweetness is key, right? This isn't just for taste, it helps with browning and gives that lovely crisp edge we all adore. I once accidentally used a quarter cup less, thinking it'd be healthier, and let me tell you, it just wasn't the same. It lacked that comforting sweetness that makes these fritters so irresistible. Don't skimp here, it's worth every granule for that balanced flavor.
- 2 tsp baking powder: The magic leavener! This is what gives your fritters that beautiful lift and airy texture. I remember one time, I grabbed baking soda instead of powder oops! The fritters came out flat as pancakes, and honestly, a bit metallic-tasting. Not a good look. Make sure it's fresh too, old baking powder just won't give your Baked Apple Fritters the puffy charm they deserve.
- 1/2 tsp salt: Just a little pinch, but oh-so-important! Salt doesn't just make things salty, it actually enhances all the other flavors. It balances the sweetness of the sugar and really makes the apple and cinnamon sing. Don't leave it out, even a tiny bit makes a world of difference in bringing out the best in our fritters. It’s a flavor enhancer, truly.
- 3/4 cup whole milk: The richness of whole milk really makes a difference. I've tried skim milk, and it just doesn't provide the same creamy texture and moisture. The fritters ended up a bit drier, a little less tender. Whole milk contributes to that golden-brown crust and keeps the inside wonderfully moist. It's like a little secret weapon for a truly comforting bite.
- 1 large egg: Our binder and richness booster! The egg helps hold everything together, giving the fritters structure and that lovely golden hue. It also adds a touch of richness that you'd miss if it wasn't there. I once forgot the egg don't ask! and the batter was just a crumbly mess. It's essential for that perfect fritter form.
- 1/4 cup (4 tbsp) unsalted butter, melted: Ah, butter! It adds so much flavor and moisture. Using unsalted butter means you control the salt content, which is super important for baking. Plus, melting it helps it incorporate smoothly into the batter, giving you that even distribution of richness. It’s what gives these beauties that tender, melt-in-your-mouth quality. Don't skip the melt!
- 1 tsp vanilla extract: That warm, inviting scent! Vanilla isn't just a flavor, it enhances all the other sweet notes. It really rounds out the apple and cinnamon. I've tried using imitation vanilla in a pinch, and honestly, it just lacks that depth. Go for the good stuff, it makes a subtle but noticeable difference in the overall deliciousness.
- 2 large Granny Smith apples, peeled, cored, and finely diced: Granny Smiths are my go-to for these fritters. Their tartness cuts through the sweetness of the batter and glaze, creating a perfect balance. Plus, they hold their shape well when baked, so you get those lovely little bursts of apple in every bite. Finely diced is key here, no giant chunks, we want apple throughout each fritter, not just in one bite!
- 1 tsp ground cinnamon: Can you even have apple fritters without cinnamon? I think not! This spice is the heart and soul of this recipe. It infuses the whole kitchen with that amazing fall aroma and pairs so perfectly with apples. It’s warm, cozy, and makes every bite feel like a hug. Don't be shy with it, but don't overdo it either a teaspoon is just right.
Whipping Up Baked Apple Fritters: Your Step-by-Step Guide
- Step 1: Prep Apples & Oven:
- First things first, let's get those apples ready! Grab your Granny Smiths, peel 'em, core 'em, and dice 'em up nice and small. We're talking tiny cubes, like little apple confetti. This helps them soften beautifully and distribute evenly throughout your Baked Apple Fritters. While you're dicing, preheat your oven to 375°F (190°C). This ensures it's piping hot and ready to give your fritters that perfect golden glow when they go in. Good prep makes all the difference!
- Step 2: Combine Dry Ingredients:
- Next up, in a big mixing bowl, whisk together your 2 cups of all-purpose flour, 1/2 cup granulated sugar, 2 tsp baking powder, 1/2 tsp salt, and 1 tsp ground cinnamon. Get it all nicely combined, no lumps allowed! This step is super important for even distribution of flavor and leavening. You want every bite of your Baked Apple Fritters to have that consistent sweetness and spice. It's like building the flavor foundation, you know?
- Step 3: Mix Wet Ingredients:
- Now for the wet stuff! In a separate, smaller bowl, whisk together your 3/4 cup whole milk, 1 large egg, 1/4 cup melted butter, and 1 tsp vanilla extract. Make sure that egg is fully incorporated and the butter isn't too hot, or you might scramble the egg oops! This liquid gold is what will bring our dry ingredients to life, creating a rich and flavorful batter that's just begging for those apples. It’s all coming together!
- Step 4: Form Fritter Batter:
- Time to bring it all together! Pour your wet ingredients into the dry mixture. Mix gently with a spatula until just combined. Don't overmix, hon! A few lumps are totally okay, overmixing develops the gluten and can make your Baked Apple Fritters tough. Then, fold in your finely diced Granny Smith apples. You want them evenly distributed, little bursts of tartness in every bite. The batter will be thick, but that's what we want for those perfect fritter shapes.
- Step 5: Bake the Fritters:
- Line a baking sheet with parchment paper. Now, using two spoons, drop generous dollops of the batter onto the prepared sheet. I usually aim for about 10-12 fritters, leaving a little space between them. They'll puff up! Pop them into your preheated oven and bake for 15-20 minutes, or until they're golden brown and cooked through. You'll know they're ready when they smell amazing and spring back slightly to the touch. The aroma of these Baked Apple Fritters filling your kitchen is just heavenly!
- Step 6: Prepare Sweet Glaze:
- While your fritters are cooling a bit, let's whip up that irresistible glaze! In a small bowl, combine 1 cup powdered sugar with 2-3 tablespoons of milk (or even apple cider for extra flavor!). Whisk until it's smooth and pourable, but not too thin. You want it to cling to the fritters, not run right off. This sweet, shiny coating is the crowning glory for your Baked Apple Fritters, adding that extra layer of deliciousness. Get ready for some serious yum!
- Step 7: Glaze and Serve:
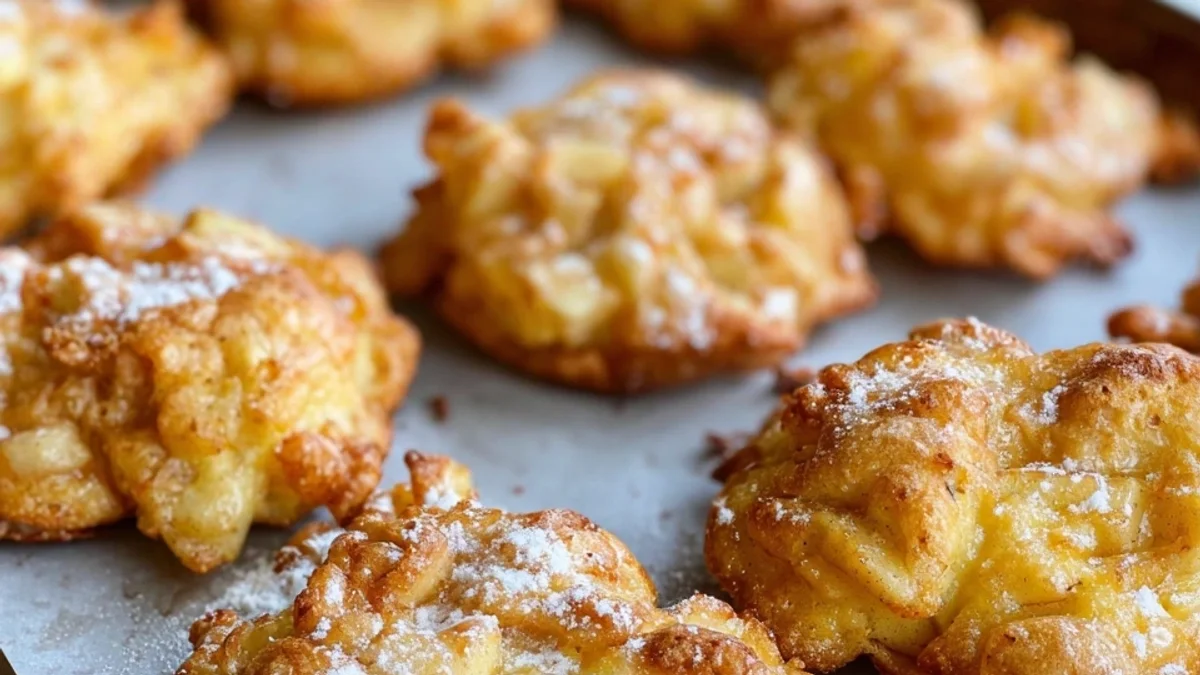
- Once the fritters are warm but not scorching hot (you don't want the glaze to melt completely off!), drizzle or dunk them into that glorious glaze. I like to use a fork to gently dip and then let the excess drip off. Place them on a wire rack to set a bit. Serve these beauties warm, maybe with an extra sprinkle of cinnamon. Seriously, these are best fresh, so grab one (or three!) and enjoy your culinary masterpiece!
There’s something so comforting about the whole process of making these. From peeling those crisp Granny Smiths to watching the batter puff up in the oven, it’s just pure joy. The smell that fills your kitchen while these Baked Apple Fritters are baking? Oh my goodness, it’s intoxicating. It’s one of those recipes that just feels like home, every single time.
Keeping Your Baked Apple Fritters Fresh
Okay, so while these Baked Apple Fritters are definitely best eaten fresh and warm, sometimes you'll have a few leftovers a rare occurrence in my house, honestly! If you do, store them in an airtight container at room temperature for up to 2 days. Any longer, and they start to lose that fresh texture. I once left them uncovered on the counter overnight, and they turned into sad, dry little rocks. Oops! You can also pop them in the fridge for up to 4 days, but warm them gently in the microwave or a low oven before eating. They won't be quite as crisp as fresh, but still pretty darn delicious, especially with a fresh cup of coffee. Don't freeze them, though, the texture just doesn't hold up well after thawing, I didn't expect that.

Playing with Ingredients for Your Baked Apple Fritters
I'm all about playing around in the kitchen, and I've tried a few swaps for these fritters! For the apples, while Granny Smiths are my favorite for that tart balance, you could totally use Honeycrisp or Fuji for a sweeter fritter. Just adjust the sugar in the batter a tiny bit if you do. Milk-wise, I've had success with almond milk in a pinch, but whole milk really gives the best texture. As for the butter, coconut oil can work if you're dairy-free, but you'll lose a bit of that buttery richness. I even tried adding a pinch of nutmeg once, and it was a nice touch! Don't be afraid to experiment, that's how we find new favorites, right? Just remember the core ingredients for the best Baked Apple Fritters.
The Best Ways to Enjoy Your Baked Apple Fritters
So, you've got these glorious fritters, now what? Honestly, a warm Baked Apple Fritter straight off the cooling rack is a masterpiece all on its own. But if you're feeling extra fancy, here are some ideas! A scoop of vanilla bean ice cream melting over a warm fritter? Oh. My. Goodness. Or maybe a dollop of whipped cream and an extra sprinkle of cinnamon. For breakfast or brunch, they're amazing with a hot cup of coffee or a tall glass of cold milk. I've even served them alongside some crispy bacon for a sweet and savory combo that was surprisingly good, I didn't expect that! They're also perfect for a cozy afternoon tea, or as a simple dessert after a fall dinner. Enjoy them however your heart desires!
The Sweet Story Behind Baked Apple Fritters
Apple fritters have such a cool history, stretching back centuries! Fritters, in general, are found in so many cultures, from Roman times to medieval Europe, often as a way to use up leftover fruit or dough. Our American version, especially the apple kind, really took off as apples became a staple crop. People would fry them up as a delicious, comforting treat, especially in the fall when apples were abundant. My twist on Baked Apple Fritters is a nod to that tradition, taking the classic flavors and making them a bit lighter and easier for the home cook. It’s like a little piece of culinary history, made fresh and cozy in your own kitchen. It's so cool to think about how food evolves, isn't it?
There you have it, my friends! These Baked Apple Fritters are truly a little piece of cozy heaven, perfect for any time you need a sweet hug. They’ve brought so much warmth to my kitchen, and I hope they do the same for yours. Give them a try, and let me know how it goes! What are your favorite fall treats? Share your thoughts in the comments below!

All Your Questions About Baked Apple Fritters Answered
- Can I use different types of apples for these Baked Apple Fritters?
Absolutely! While Granny Smiths are my favorite for that tart punch, you can totally use Honeycrisp or Fuji for a sweeter fritter. Just keep in mind that softer apples might break down a bit more, but they’ll still be delicious. Experiment and find your perfect apple match, hon!
- My fritters came out flat. What went wrong?
Oh no! This usually means your baking powder might be old or you overmixed the batter. Make sure your baking powder is fresh, and when combining wet and dry ingredients, mix just until combined. A few lumps are fine, really! Overmixing develops gluten, leading to tough, flat fritters.
- Can I make the batter ahead of time?
I wouldn't recommend it, honestly. The baking powder starts working as soon as it hits the wet ingredients, so if you let it sit too long, you'll lose that lovely lift. It’s best to mix the batter and bake these Baked Apple Fritters right away for the best texture and fluffiness.
- How do I reheat leftover fritters?
For sure! Pop them in the microwave for 10-15 seconds for a quick warm-up. Or, if you want a bit of crispness back, a few minutes in a low oven (around 250°F or 120°C) works wonders. They won't be quite like fresh, but still a delightful treat.
- Can I add nuts or other spices to the batter?
Totally! A pinch of nutmeg or a tiny bit of allspice would be lovely with the cinnamon. Chopped pecans or walnuts would also add a fantastic crunch and flavor. Just don't go too crazy, we want the apple and cinnamon to shine! It's all about making it your own, you know?