

I remember the first time I tasted a truly good Salted Caramel cheesecake. It wasn't in some fancy restaurant, honestly. It was at a small cafe during a particularly rainy afternoon, and the world outside just melted away with that first bite. The creamy texture, the rich sweetness, and that unexpected pop of salt it was a revelation! I went home determined to recreate that magic, even if it meant a few kitchen mishaps. This isn't just a dessert, it's a memory, a feeling of pure comfort that I've chased and finally captured in this recipe. It’s a little piece of joy, I swear!
My first attempt at this cheesecake was… well, let's just say it involved a very dramatic crack down the middle and a caramel sauce that seized up like concrete. I think I shed a tear or two, not gonna lie! My kitchen looked like a flour bomb went off, and the dog probably thought I was having a meltdown. But you know what? Each little oops taught me something, and now I can share all my hard-won wisdom so your cheesecake turns out beautifully from the start!
Ingredients for a Stunning Cheesecake
- Graham Cracker Crumbs: These are the backbone of your crust, providing that classic crumbly texture. Honestly, don't skimp here, I've tried other cookies, and they just don't hit the same.
- Granulated Sugar (for crust &, filling): Just enough to sweeten without overpowering. For the crust, it binds things, for the filling, it's the classic sweet note.
- Unsalted Butter (melted): This binds the crust together. Use unsalted, please! It gives you control over the saltiness, especially with the salted caramel.
- Cream Cheese (full-fat, room temperature): The star of the show for this Salted Caramel Cheesecake. You must use full-fat, and it must be at room temperature, or you'll have lumpy cheesecake, and nobody wants that! I learned that the hard way.
- Sour Cream (full-fat, room temperature): Adds an incredible tang and creaminess to the filling. I once tried light sour cream, and the texture was just... off. Stick with full-fat for that dreamy mouthfeel.
- Large Eggs (room temperature): These are your binding agents. Room temperature eggs mix in smoothly, preventing overmixing which can lead to cracks. I always forget to take them out, but it's worth the wait!
- Vanilla Extract: A splash of good quality vanilla makes all the difference, enhancing all those creamy, sweet flavors.
- Granulated Sugar (for caramel): The base for our gorgeous salted caramel.
- Water (for caramel): Helps the sugar dissolve evenly to prevent crystallization a little trick I picked up after many failed batches!
- Heavy Cream (warm): Essential for that luscious, pourable caramel. Warm it gently before adding to prevent the caramel from seizing up. Trust me on this one.
- Unsalted Butter (for caramel): Adds richness and a beautiful sheen to the caramel.
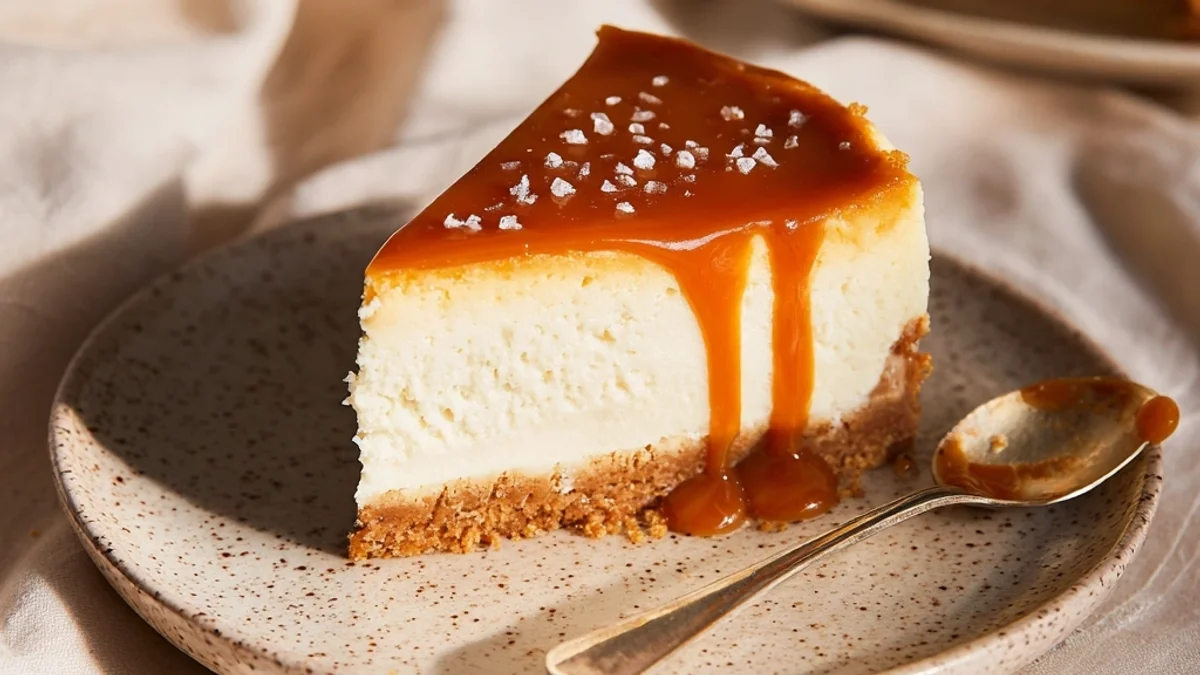
- Sea Salt (fine and flaked): The "salted" in Salted Caramel Cheesecake! Fine sea salt for the caramel itself, and flaky for garnish that little crunch and burst of salt is everything.
Crafting Your Salted Caramel Cheesecake: Step-by-Step
- Step 1: Prep the Pan &, Crust Foundation
- First things first, let's get that springform pan ready! I usually wrap the bottom and sides tightly with heavy-duty foil seriously, do this, it prevents water from seeping in during the water bath. Then, in a medium bowl, combine your graham cracker crumbs, sugar, and melted butter. Mix it well until it looks like wet sand. Press this mixture firmly into the bottom of your prepared pan. I use the bottom of a glass to get it really compact. Pop it in the fridge for about 15 minutes to chill while you get the filling ready. This helps prevent a crumbly crust later, I promise!
- Step 2: Whip Up the Creamy Cheesecake Filling
- Preheat your oven to 325°F (160°C) and get a kettle of water boiling for the water bath. Now, for the star: in a large bowl, beat the room temperature cream cheese on medium speed until it’s super smooth and fluffy, no lumps allowed! This is where patience pays off. Gradually add the granulated sugar, beating until just combined. Then, mix in the sour cream and vanilla extract until everything is homogenous. Don't overmix here, overbeating can introduce too much air, which can lead to cracks. I made that mistake once, and my cheesecake looked like a desert canyon!
- Step 3: Gently Fold in the Eggs for Your Cheesecake
- This step needs a light hand. Add the eggs one at a time, mixing on low speed only until each egg is just incorporated. Seriously, just incorporated! Scrape down the sides of the bowl after each addition to make sure everything is blended. Overmixing eggs is a big no-no for cheesecake, it develops too much air and can cause cracking during baking. The mixture should be smooth and creamy, smelling faintly of vanilla and tang. Pour this gorgeous filling over your chilled graham cracker crust.
- Step 4: Bake Your Cheesecake with a Water Bath
- Place your foil-wrapped springform pan inside a larger roasting pan. Carefully pour the boiling water into the roasting pan, making sure it comes about halfway up the sides of the springform pan. This water bath is crucial for a creamy, crack-free cheesecake it provides a moist environment. Carefully transfer the whole setup to your preheated oven. Bake for 60-75 minutes, or until the edges are set but the center still jiggles slightly when you gently shake the pan. Don't overbake, or it'll be dry!
- Step 5: Cool and Chill Your Cheesecake
- Once baked, turn off the oven and prop the door open slightly. Let the cheesecake cool in the water bath inside the oven for about an hour. This slow cooling also helps prevent cracks. After an hour, carefully remove the cheesecake from the water bath and the roasting pan. Remove the foil and let it cool completely on a wire rack at room temperature. Once cool, cover it loosely with plastic wrap and chill in the refrigerator for at least 4-6 hours, or even better, overnight. I know, the waiting is the hardest part!
- Step 6: Craft the Salted Caramel Drizzle
- Now for the magic! In a medium, heavy-bottomed saucepan, combine the granulated sugar and water. Cook over medium-high heat, without stirring, until the sugar dissolves and the syrup turns a deep amber color. This usually takes 8-12 minutes. Swirl the pan occasionally to ensure even cooking. Immediately remove from heat and carefully pour in the warm heavy cream (it will bubble up, so be careful!). Whisk until smooth, then stir in the unsalted butter and fine sea salt. Let it cool slightly, then drizzle generously over your chilled cheesecake. Sprinkle with flaky sea salt for that extra pop! Slice and serve, watching everyone's eyes light up!
Honestly, getting this dessert just right felt like winning a tiny culinary marathon. I remember one time, I was trying to photograph it, and the caramel was still a little too warm, so it just kept oozing everywhere! My counter was a sticky mess, but the smell was divine. It's those little imperfect moments that make cooking so real and fun, don't you think? Every slice holds a story of persistence and pure, sweet reward.
Salted Caramel Cheesecake Storage Tips
This Salted Caramel Cheesecake actually holds up really well, which is great because it means you can enjoy it for days! Once it's fully cooled and the caramel has set, store any leftovers in an airtight container in the refrigerator. I usually just cover the whole pan tightly with plastic wrap if there are still a few slices left. It'll stay fresh and delicious for up to 4-5 days. I've tried freezing individual slices wrapped in plastic wrap and then foil, and they do okay, but the texture isn't quite as creamy after thawing. The caramel might get a little softer, too. My honest advice? Enjoy it fresh, but don't be afraid to keep it chilled for a few days, it tastes even better the next day sometimes, as the flavors really meld. Just don't microwave it to "warm it up" the caramel gets weird, trust me!

Salted Caramel Cheesecake Ingredient Substitutions
Okay, let's talk swaps for this Salted Caramel Cheesecake. For the graham cracker crust, I've had some success with digestive biscuits or even shortbread cookies if you're feeling fancy. It gives a slightly different flavor profile, but still good! I tried using vanilla wafers once, and it worked... kinda, but it was a bit too sweet for my taste. For the cream cheese, please, for the love of all things delicious, use full-fat. Low-fat just won't give you that luxurious texture. If you don't have sour cream, plain full-fat Greek yogurt can work in a pinch for the tang, but the texture might be a touch denser. As for the caramel, don't swap the heavy cream for anything lighter, it just won't caramelize and emulsify properly. I learned that after a very sad, separated caramel incident!
Serving Your Cheesecake
This cheesecake is a showstopper all on its own, but a few little touches can make it even more special. I love serving it with a dollop of freshly whipped cream it adds another layer of creamy goodness. A small side of fresh berries, like raspberries or blackberries, provides a lovely tart contrast to the richness. For drinks, a robust coffee or a dessert wine would be divine. Honestly, though, my favorite way to enjoy it is with a big mug of herbal tea, curled up on the couch, watching a good movie. It's the ultimate cozy night in dessert. It’s also a fantastic centerpiece for any celebration, people always rave about it!
The Sweet Story Behind Salted Caramel Cheesecake
Cheesecake itself has ancient roots, dating back to ancient Greece, but the creamy, New York-style cheesecake we know and love today really took off in the early 20th century. Adding salted caramel, though, that’s a more modern twist! Salted caramel itself became a huge trend in the food world a few decades ago, marrying that irresistible sweet-salty combination that just makes your taste buds sing. For me, this Salted Caramel Cheesecake is special because it combines the comforting classic with an exciting, complex flavor. It feels both nostalgic and utterly contemporary, a perfect blend of old and new that reminds me of how cooking evolves and always finds new ways to delight.
Making this dessert always brings a smile to my face, despite the occasional kitchen chaos. There’s something so satisfying about seeing that beautiful, creamy slice, knowing all the love (and maybe a few expletives, haha!) that went into it. It’s a labor of love, for sure, but the reward is so worth it. I really hope you give this one a try and make it your own. Don't forget to tell me how your Salted Caramel Cheesecake turns out!

Frequently Asked Questions About Salted Caramel Cheesecake
- → Why did my Salted Caramel Cheesecake crack?
Oh, the dreaded crack! It usually happens from overmixing the batter (introducing too much air) or drastic temperature changes during baking/cooling. That's why the water bath and slow cooling in the oven are so important, hon!
- → Can I use store-bought caramel sauce for this cheesecake?
You totally can if you're in a pinch! Just make sure it's a good quality one. But honestly, making your own salted caramel isn't as scary as it sounds, and the flavor is just miles better, I think!
- → How do I know when my cheesecake is done baking?
It's ready when the edges are set and slightly puffed, but the very center (about a 2-inch circle) still has a slight jiggle. It will continue to set as it cools, so don't be tempted to overbake it!
- → Can I make this cheesecake ahead of time?
Absolutely, and I often do! It actually tastes even better the next day after the flavors have had a chance to meld. Just make sure it's well-chilled before slicing and serving. It's a great make-ahead dessert!
- → What if my caramel seizes up or gets lumpy?
Don't panic! This happened to me so many times. It usually means your cream wasn't warm enough or you added it too fast. Sometimes, you can gently reheat it over low heat, whisking constantly, and it might smooth out. If not, don't worry, just try again!