

Okay, friend, let me tell you about the first time I met the Brooklyn Blackout Cake. I was scrolling through an old cookbook, looking for something to really impress at a potluck, when this dark, brooding photo just jumped out at me. I mean, pure chocolate, through and through? My inner chocoholic screamed! I was a bit intimidated by all the layers and the promise of 'blackout,' but I just had to try it. Little did I know, this wasn't just a cake, it was an experience. And now, it's a staple in my kitchen, a real showstopper every single time.
Oh, the first time I made the pudding for the Brooklyn Blackout Cake, I got distracted by a cat video (don't judge!). I came back to a lumpy, burned mess at the bottom of the pan. Total disaster! Had to start over, scraping every bit of burnt sugar out. My kitchen smelled like a campfire for a bit, oops. Lesson learned: pudding waits for no cat video, no matter how cute!
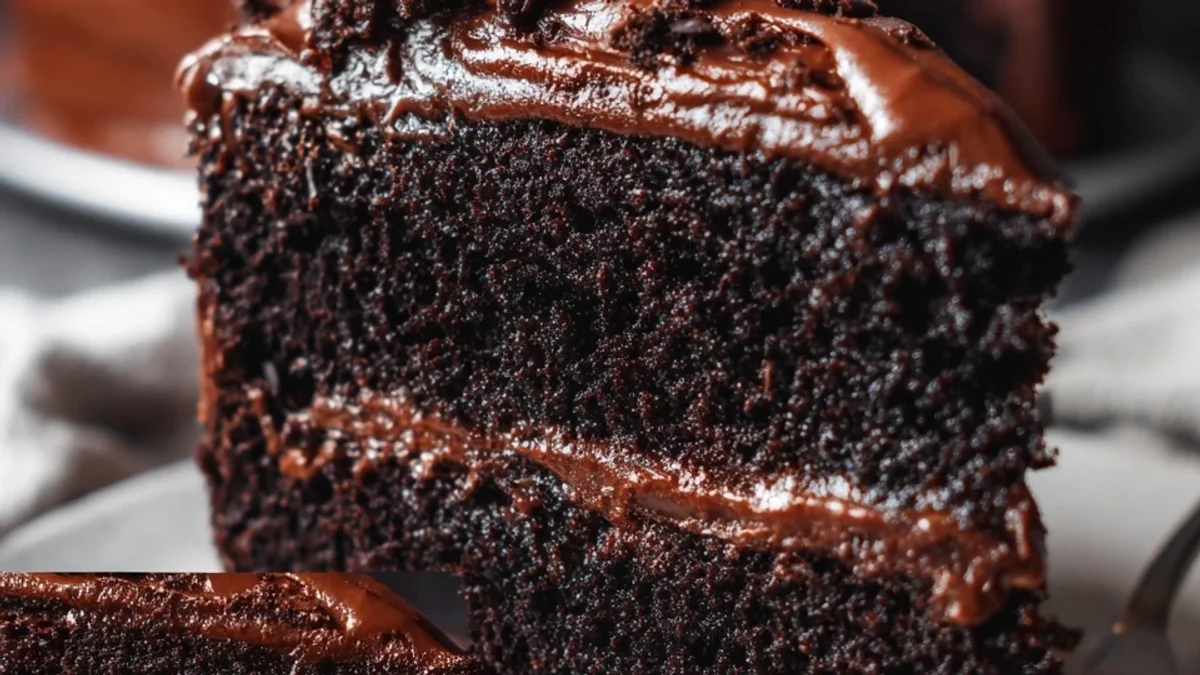
Ingredients for the Ultimate Brooklyn Blackout Cake
- 2 cups all-purpose flour: Flour is the backbone, right? For this cake, you want good quality all-purpose. It gives the cake its structure, holding all that chocolatey goodness together. I've tried using cake flour once, thinking it would be extra tender, but it made the layers too delicate for all that pudding and crumb. Stick to all-purpose, it's the reliable workhorse we need for a sturdy, yet moist, crumb.
- 3/4 cup Dutch-processed cocoa powder: This is where the 'blackout' magic starts, my friend. Dutch-processed cocoa is crucial because it's darker and less acidic than natural cocoa, giving us that intense, deep chocolate flavor and color without needing extra leavening. It's what makes the Brooklyn Blackout Cake truly live up to its name. Don't skimp, and don't swap it out, it's the star of the show for that rich, fudgy taste we're going for.
- 1 cup whole milk: Whole milk adds a fantastic richness and moisture to our cake batter. I've tried using lower-fat milk in a pinch, and honestly, the cake just wasn't as tender or flavorful. The fat in whole milk helps create that velvety texture and contributes to the overall decadence of this cake. It's a small detail, but it makes a big difference in the final product, helping create a super moist crumb.
- 1/2 cup vegetable oil: Oil is my secret weapon for super moist cakes, especially this one. Unlike butter, which can make cakes a bit drier after cooling, oil keeps things incredibly tender and soft for days. It also contributes to that fine, even crumb. I've used canola oil, sunflower oil, whatever I have on hand, and it always works beautifully. It's a simple swap that makes a huge impact on the cake's texture.
- 2 tsp vanilla extract: Don't underestimate the power of good vanilla! While chocolate is the star, vanilla really rounds out and enhances those deep cocoa notes, adding complexity. I always use a good quality pure vanilla extract, imitation just doesn't cut it here. It's like the bassline in a great song you might not notice it explicitly, but it makes everything else sound so much better and richer.
- 1 cup hot brewed coffee: Okay, this is the ultimate secret ingredient for any chocolate cake, and especially for the Brooklyn Blackout Cake! You won't taste coffee at all, I promise. What it does is deepen and intensify the chocolate flavor, making it incredibly rich and complex. It's like a flavor enhancer, bringing out all the nuances of the cocoa. Just make sure it's hot, it helps bloom the cocoa and dissolve the sugar beautifully.
Making Your Own Brooklyn Blackout Cake: Step-by-Step
- Step 1: Prepare Cake Dry Mix:
- First things first, get your dry ingredients together. Whisk those 2 cups of flour, 2 cups of sugar, 3/4 cup Dutch-processed cocoa, 1 1/2 tsp baking soda, and 1 tsp salt in a big bowl. You want it all super well combined, no lumps allowed! This step is so satisfying, seeing all those dark cocoa bits blend into a uniform, promising chocolate cloud. It sets the stage for the amazing depth of flavor.
- Step 2: Combine Wet, Bake Cakes:
- Now for the wet stuff! In another bowl, whisk your eggs, milk, oil, and vanilla. Pour this into your dry mix, then slowly stream in that hot brewed coffee. The batter will be thin, don't panic! That's exactly what we want for a super moist cake. Divide evenly into your prepared pans and bake until a toothpick comes out clean. The aroma filling your kitchen will be pure heaven, a true preview of the Brooklyn Blackout Cake magic.
- Step 3: Cook Silky Pudding:
- This is where the magic happens for the filling. Whisk your sugar, cocoa, flour, and salt in a saucepan. Gradually whisk in milk, then eggs. Cook over medium heat, stirring constantly, until it thickens into a beautiful, glossy, silky pudding. This step requires your full attention, don't walk away! You'll know it's ready when it coats the back of a spoon. It’s the heart and soul of the Brooklyn Blackout Cake, so make it perfect!
- Step 4: Cool, Crumb Cakes:
- Patience, my friend, patience! Let those beautiful cake layers cool completely on a wire rack. While they're cooling, grab one of the cooled cakes yes, just one and gently crumble it up. This is for the iconic 'blackout' crumb coating. You want fine, even crumbs. It might feel a little weird to demolish a cake layer, but trust me, it's essential for that signature look and texture of a proper Brooklyn Blackout Cake.
- Step 5: Assemble Cake Layers:
- Time for assembly! Place your first cake layer on your serving platter. Spread a generous amount of that luscious chocolate pudding over it, almost to the edges. Top with the second cake layer, then another generous layer of pudding. Stack 'em up, making sure they're centered. It's starting to look like a cake now, a dark, mysterious tower of chocolate goodness.
- Step 6: Crumb Coat, Chill:
- Now for the fun part: the blackout! Take those beautiful crumbs you made earlier. Gently press them all over the top and sides of your pudding-covered cake. Don't be shy! You want a full, even coating. This isn't just for looks, it helps seal in moisture and gives it that distinctive 'blackout' finish. Once it's fully coated, pop it into the fridge for at least an hour to let everything set up. The anticipation for this Brooklyn Blackout Cake is real!
Making this cake always feels like a little culinary adventure. From the intense aroma of the cocoa and coffee filling the kitchen, to the satisfying whisking of the silky pudding, it's a sensory journey. There’s a quiet joy in watching those layers come together, knowing the deliciousness that awaits. It’s a labor of love, but oh so worth every single step for that first amazing bite.
Keeping Your Brooklyn Blackout Cake Fresh: Storage Secrets
Okay, so you've got leftover cake (if that's even a thing with this masterpiece!). The best way to store your Brooklyn Blackout Cake is in an airtight container in the fridge. It'll stay fresh and delicious for up to 3-4 days. I once left a slice uncovered on the counter overnight, thinking it would be fine, and woke up to a sad, dry piece of what used to be heaven. Nope, don't do that! The pudding needs that cold to stay firm and the cake layers need protection from drying out. You can also freeze individual slices, well-wrapped, for a chocolate emergency later. Just thaw in the fridge before serving.

Swapping Ingredients in Your Brooklyn Blackout Cake
I've played around with substitutions a bit, you know, for science! For the vegetable oil, I've used canola and even a light olive oil in a pinch, and they both worked fine, but stick to neutral oils. As for the whole milk, almond milk or oat milk can work in the cake batter if you're dairy-free, but the pudding really shines with whole milk's richness. I haven't found a great non-dairy pudding swap that gives the same silkiness, honestly. And please, please, don't swap the Dutch-processed cocoa! I tried natural cocoa once, and the color and flavor just weren't the same. It lacked that deep, dark intensity. Learn from my oops!
How to Serve Your Decadent Brooklyn Blackout Cake
When it comes to serving this beauty, less is more, sometimes! A slice of Brooklyn Blackout Cake is a meal in itself, but if you want to elevate it, a dollop of unsweetened whipped cream or a scoop of really good vanilla bean ice cream is a dream. The coolness and creaminess balance the intense chocolate perfectly. I also love serving it with a strong cup of coffee or a glass of red wine, like a Cabernet Sauvignon, to really bring out those deep cocoa notes. For a fun twist, a sprinkle of flaky sea salt on top before serving can be surprisingly delightful, enhancing all that chocolatey goodness.
The Sweet History of Brooklyn Blackout Cake
The Brooklyn Blackout Cake has such a cool history, originating from the Ebinger Baking Company in Brooklyn during WWII. It was named after the wartime blackouts, you know, when cities had to dim their lights. It quickly became a local legend, a symbol of comfort during tough times. My grandma, who grew up in that era, used to talk about how special a slice of Ebinger's cake felt. It's more than just a recipe, it's a piece of history, a taste of resilience and joy. Recreating it in my own kitchen feels like a nod to that era, a way to connect with those stories and keep a little bit of Brooklyn history alive.
So there you have it, my friend, my ultimate guide to creating a showstopping Brooklyn Blackout Cake right in your own kitchen. It's a decadent journey, a celebration of chocolate, and a little piece of history. I hope you give it a try and fall in love with its dark, mysterious charm just like I did. Let me know in the comments how your blackout adventure goes, and what your favorite part was!

Your Questions About Brooklyn Blackout Cake, Answered!
- Can I make the Brooklyn Blackout Cake ahead of time?
Absolutely! This cake actually tastes even better the next day, as the flavors meld and the pudding sets perfectly. I usually bake the cakes and make the pudding a day before, then assemble and crumb coat the morning of, or even the night before, I plan to serve it. It’s a fantastic make-ahead dessert for parties!
- Why do you use hot coffee instead of water?
Hot coffee is a secret weapon for chocolate cakes! You won't taste the coffee itself, but it dramatically enhances and deepens the chocolate flavor. It makes the cocoa bloom, releasing its full richness and complexity. I promise, it just makes the chocolate taste more chocolatey, which is exactly what we want here.
- My pudding turned out lumpy, what went wrong?
Oh no, that's a classic oops! Lumpy pudding usually means you didn't stir constantly or the heat was too high. You need to keep whisking continuously while it cooks to prevent lumps from forming at the bottom of the pan. If it’s slightly lumpy, you can try pushing it through a fine-mesh sieve, but constant stirring is key!
- Can I use natural cocoa powder instead of Dutch-processed?
I wouldn't recommend it for this Brooklyn Blackout Cake, honestly. Dutch-processed cocoa is less acidic and gives that signature dark color and deep, rich chocolate flavor that's crucial to the 'blackout' experience. Natural cocoa will result in a lighter color and a slightly different, more acidic flavor profile. Stick to Dutch-processed for the authentic taste.
- How do I get those perfect crumbs for the coating?
The trick to perfect crumbs is to make sure your cake layer is fully cooled, or even slightly chilled. You want to gently rub the cake between your hands or pulse it briefly in a food processor until you have fine, even crumbs. Don't overdo it, or you'll end up with a paste! Just enough to get that iconic blackout finish.