

I remember the first time I tried to make mac and cheese from scratch. It was a disaster, honestly. Store-bought boxes were my comfort zone for years. But then, I stumbled upon a recipe promising an 'upgraded' version, and my curiosity was piqued. I was skeptical, to be real. Could it really be that much better? One bite of that creamy, tangy goodness, and I was hooked. The aroma of bubbling cheese and a hint of something special filled my little apartment. This Upgraded Mac and Cheese isn't just a meal, it's a hug in a bowl, a reminder of cozy evenings, and a testament to how a few extra steps transform a classic.
Oh, the chaos! One time, I was so excited to bake this Upgraded Mac and Cheese that I completely forgot to preheat the oven. I put the casserole in, set the timer, and twenty minutes later, realized it was still cold. Oops! My husband just laughed and we had a late dinner, but honestly, even half-baked, it smelled pretty good. It taught me to double-check my steps, especially when hunger strikes hard!
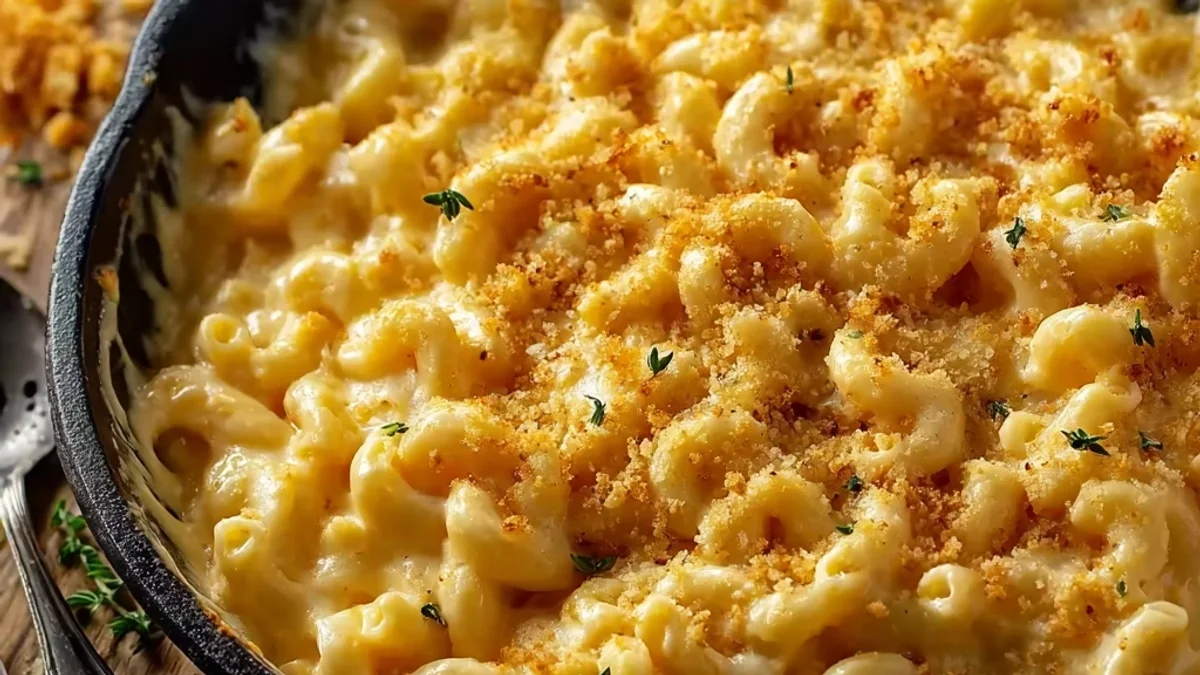
Upgraded Mac and Cheese Essentials
- Elbow Macaroni: This is the classic, right? It holds onto that creamy sauce like a champ. Honestly, I’ve tried other shapes, but the elbow just feels right for Upgraded Mac and Cheese. Don't overcook it, please! We're aiming for al dente here, so it can finish cooking in the oven without turning to mush.
- Unsalted Butter: We're building a roux, and butter is key. Unsalted gives us control over the saltiness later. I always use good quality butter, you can taste the difference, believe me. Don't skimp, it's the foundation for that rich sauce.
- All-Purpose Flour: For that beautiful, thick roux. This is where the magic starts. I once tried using cornstarch instead and it worked... kinda, but the texture wasn't quite right. Stick to flour for that silky smooth sauce.
- Whole Milk: Please, hon, don't use skim milk. Just don't. We need the fat for a truly creamy, luscious sauce. I swear by whole milk for this Upgraded Mac and Cheese, anything less just dilutes the experience. I’ve had watery sauce disasters from trying to be "healthy," and it was not worth it.
- Heavy Cream: This is my little secret for extra richness. It takes the sauce from creamy to absolutely decadent. If you want to make this Upgraded Mac and Cheese truly special, don't skip it. It's a small addition that makes a big difference in mouthfeel.
- Sharp Cheddar Cheese: This is a must for that classic, tangy bite. Grate your own, seriously. Pre-shredded cheese has anti-caking agents that can make your sauce grainy. I learned that the hard way, with a weirdly lumpy mac and cheese that tasted… off. Freshly grated melts like a dream.
- Gruyère Cheese: My secret weapon for that nutty, complex flavor that takes this mac and cheese from good to gourmet. It adds a depth you didn't know you needed. I remember finding it on sale once and deciding to experiment, it was a total game-changer for this Upgraded Mac and Cheese recipe!
- Parmesan Cheese: A little bit in the sauce, and some for the topping! It adds a salty, umami punch that rounds out the other cheeses. I always have a wedge in my fridge, it's so versatile.
- Smoked Paprika: A little sprinkle adds a subtle smoky warmth that just elevates everything. I didn't expect that it would make such a difference, but it really rounds out the flavors. If you don't have smoked, regular paprika works, but the smoky kind is where it's at for me.
- Dijon Mustard: Just a tiny bit! It doesn't make your mac and cheese taste like mustard, I promise. It just brightens the cheese flavor and adds a little tang. I always keep a good quality Dijon in my fridge for this and other sauces. It's a flavor booster you won't regret.
- Panko Breadcrumbs: For that irresistible, golden, crispy topping. Panko is superior to regular breadcrumbs here, it gives you a much crunchier texture. I love how it crackles when you dig in. Sometimes I toast them in butter first for extra flavor.
Crafting Your Upgraded Mac and Cheese
- Boil the Pasta Just Right:
- First things first, get a big pot of water boiling. Don't forget to salt it generously, this is where I always forget to salt the water, and honestly, bland pasta is just sad. Cook your elbow macaroni according to package directions, but aim for al dente a little firm to the bite. It’s going to finish cooking in the oven, so we don't want mushy pasta. Drain it really well and set it aside. I can almost smell the steam rising, a comforting start to our Upgraded Mac and Cheese adventure.
- Build Your Roux, The Heart of the Sauce:
- In a large saucepan or Dutch oven, melt your unsalted butter over medium heat. Once it’s shimmering, whisk in the all-purpose flour. Stir constantly for about 1-2 minutes until it forms a pale, golden paste. This is your roux, the base of our incredibly creamy sauce. Don't let it brown too much unless you want a nuttier flavor, which, to be real, isn't what we're going for in this Upgraded Mac and Cheese. I once walked away for a second and burned it, had to start all over! Oops!
- Whisk in the Milk and Seasonings:
- Gradually, and I mean gradually, whisk in the whole milk and heavy cream. Pour a little, whisk until smooth, then add more. This prevents lumps, and trust me, you don't want lumpy cheese sauce. Bring it to a gentle simmer, whisking occasionally, until it thickens. It should coat the back of a spoon. Now, add your Dijon mustard, smoked paprika, garlic powder, onion powder, salt, and pepper. The aroma starts to fill the kitchen here, it’s warm and inviting, truly setting the stage for an Upgraded Mac and Cheese.
- Melt the Cheeses to Perfection:
- Remove the saucepan from the heat. This is important! Stir in your freshly grated sharp cheddar, Gruyère, and Parmesan cheeses, a handful at a time, whisking until each addition is completely melted and smooth before adding more. This ensures a beautifully silky, lump-free sauce. Taste and adjust seasonings if needed, sometimes I add a tiny bit more salt. Seeing those cheeses melt into a golden, gooey river? That's pure kitchen joy, the essence of our Upgraded Mac and Cheese.
- Combine and Assemble for Baking:
- Add your drained al dente macaroni to the cheese sauce, stirring gently to make sure every single noodle is coated in that luscious goodness. I usually use a big spoon for this, trying not to splash too much. Pour the mixture into a greased 9x13 inch baking dish. This is where it starts to look like a proper casserole, ready for its transformation. My kids always try to sneak a spoonful at this stage, and honestly, who can blame them?
- Bake to Golden, Bubbly Perfection:
- In a small bowl, mix the Panko breadcrumbs with a tablespoon of melted butter. Sprinkle this evenly over the Upgraded Mac and Cheese. Bake in a preheated oven at 375°F (190°C) for 20-25 minutes, or until the top is golden brown and bubbly. Let it rest for 5-10 minutes before serving, this helps the sauce set up a bit. The smell filling your home right now? That's the smell of pure comfort, a truly Upgraded Mac and Cheese ready to be devoured!
There's something so satisfying about pulling a hot, bubbly dish of Upgraded Mac and Cheese from the oven. I remember one chilly evening, after a particularly chaotic day, this dish was exactly what my soul needed. The crispy top, the creamy interior it just melted all the stress away. It’s those small kitchen victories, even with a few spilled noodles or a slightly burnt roux in the past, that make cooking so rewarding.
Upgraded Mac and Cheese Storage Secrets
Leftovers of this Upgraded Mac and Cheese are actually pretty fantastic, which is a win in my book! If you have any remaining (a rare occurrence in my house, honestly), let it cool completely before transferring it to an airtight container. It’s good in the fridge for up to 3-4 days. Now, reheating is where I've had some oops moments. I microwaved it once and the sauce separated so don't do that lol. The best way I've found is to reheat it gently on the stovetop with a splash of milk or cream, stirring occasionally, until it's warmed through and creamy again. Or, if you're feeling fancy, cover a portion with foil and warm it in the oven at 300°F (150°C) until heated through, it helps keep that lovely texture.

Upgraded Mac and Cheese Flavor Swaps
I've experimented with a bunch of cheese combinations for this Upgraded Mac and Cheese, and honestly, most have worked... kinda. For a milder flavor, you could swap out the Gruyère for Monterey Jack or even a mild white cheddar. I tried a smoked gouda once, and it gave it a really unique, smoky depth that was surprisingly good! If you're not a fan of Dijon, a tiny dash of Worcestershire sauce can add a similar umami boost without the mustard flavor, though I do prefer the Dijon. For an extra kick, a pinch of cayenne pepper or a dash of hot sauce in the cheese sauce is a fun addition. I've even thrown in some cooked bacon bits for a smoky, salty crunch, which, let's be real, is always a good idea.
Serving Your Upgraded Mac and Cheese
This Upgraded Mac and Cheese is hearty enough to be a meal on its own, but it plays well with others too! For a simple weeknight dinner, I love serving it with a crisp, green salad dressed with a light vinaigrette that little bit of freshness cuts through the richness beautifully. If you’re making it for a special occasion, roasted asparagus or steamed broccoli are fantastic sides. And for drinks? A dry white wine, like a Chardonnay or Sauvignon Blanc, pairs wonderfully, or even a crisp hard cider. Honestly, for me, a big bowl of this mac and cheese and a rom-com on a Friday night? Yes please. It’s comfort food that just begs for a cozy evening in.
The Story Behind Upgraded Mac and Cheese
Macaroni and cheese has such a rich history, dating back centuries, with versions appearing in cookbooks as early as the 1700s. The version we mostly know and love gained popularity in America, supposedly brought by Thomas Jefferson! My personal connection to this Upgraded Mac and Cheese came from trying to recreate a dish I had at a small, unassuming bistro years ago. It wasn't just "mac and cheese", it had this incredible depth of flavor. I spent weeks trying to figure out their secret, experimenting with different cheeses and spices until I landed on this combination. It became my personal quest, a way to elevate a beloved comfort food into something truly special. It’s a dish that embodies the spirit of home cooking, taking something familiar and making it uniquely your own.
And there you have it, my version of this Upgraded Mac and Cheese. It’s messy, it’s cheesy, and honestly, it’s one of my favorite things to make. Pulling it from the oven, seeing that bubbly, golden crust and smelling all those rich flavors? Pure happiness. I hope you give it a whirl in your own kitchen, maybe even add your own little twist. Don't forget to tell me how your cheesy adventure turns out!

Frequently Asked Questions
- → Can I make this Upgraded Mac and Cheese ahead of time?
Yes, you totally can! You can assemble the whole dish, cover it tightly, and refrigerate it for up to 24 hours before baking. Just add about 10-15 minutes to the baking time if it's going into the oven cold. I've done this for potlucks and it works great, though the topping is best added right before baking.
- → What if I don't have Gruyère cheese?
No Gruyère? No problem! While it adds a special touch, you can substitute it with another good melting cheese like Fontina, white cheddar, or even a good quality Swiss. The flavor profile will shift a little, but it'll still be a rich and delicious Upgraded Mac and Cheese, I promise!
- → My cheese sauce turned out lumpy, what happened?
Oh, I've been there! Lumpy sauce usually happens if you add the milk too fast or if the cheese is added while the sauce is still boiling. Remember to add milk gradually, whisking constantly, and take the pan off the heat before stirring in the cheese. Patience is key for a silky smooth Upgraded Mac and Cheese sauce!
- → How do I store and reheat leftovers of this Upgraded Mac and Cheese?
Store any leftovers in an airtight container in the fridge for up to 3-4 days. For reheating, I find the oven at 300°F (150°C) covered with foil works best to maintain creaminess. Or gently on the stovetop with a splash of milk. Avoid the microwave if you can, it can make the sauce separate, which is a bummer!
- → Can I add meat or vegetables to this recipe?
Absolutely! This Upgraded Mac and Cheese is super adaptable. I've added cooked ham, leftover rotisserie chicken, or even sautéed mushrooms and spinach. Just stir in your cooked additions when you combine the pasta and cheese sauce. Experiment, have fun with it!