

I remember those Friday nights, pizza boxes piled high, and the little paper bag of garlicky dough knots sitting right in the middle of the table. Honestly, I think I loved those more than the pizza sometimes! We’d always fight over the last one, my brother and I. Years later, I decided it was time to bring that pure joy into my own kitchen. The first time, I made a total mess, flour everywhere, dough stuck to my eyebrows, but when those warm, fragrant homemade garlic knots came out of the oven, smelling like pure magic, I knew I was onto something. This recipe isn't just about food, it's about recreating those happy, messy memories.
My very first attempt at these homemade garlic knots was a bit of a disaster, to be real. I forgot to check if my yeast was still alive, and the dough just sat there, stubbornly refusing to rise. It looked more like a sad, flat pancake than anything resembling a knot! I ended up with dense, garlic-flavored hockey pucks. But hey, we learn, right? Now, I always do the little yeast proofing trick, and my kitchen rarely sees such doughy despair.
Ingredients
- Warm Water: Not too hot, not too cold think bathwater warm. Too hot kills the yeast, too cold and it just sleeps. I learned that the hard way, oops!
- Granulated Sugar: Just a pinch, it’s food for our little yeast friends. Don't worry, these aren't sweet homemade garlic knots!
- Active Dry Yeast: Fresh yeast makes all the difference. If it's old, your dough won't rise, and that's just a sad situation. I always buy new yeast every few months.
- All-Purpose Flour: My go-to. You could try bread flour for a chewier texture, but honestly, AP works wonderfully for these homemade garlic knots.
- Salt: Crucial for flavor in the dough. Don't skip it, or your knots will taste flat. I always use kosher salt.
- Olive Oil: A good quality extra virgin olive oil makes a difference in the dough's texture and adds a subtle richness. Plus, it keeps things from sticking.
- Fresh Garlic Cloves: PLEASE use fresh. Minced from a jar just doesn't hit the same. We're making garlic knots, so let's really commit to the garlic!
- Unsalted Butter: Real butter, always. Unsalted so we can control the saltiness in our herb butter.
- Fresh Parsley: Adds a pop of color and fresh, herbaceous flavor. Curly or flat-leaf, whatever you have.
- Grated Parmesan Cheese: Skip the pre-shredded stuff if you can. Freshly grated melts better and tastes so much richer on these homemade garlic knots.
Instructions
- Awakening the Yeast:
- Grab a small bowl and pour in your warm water remember, bathwater warm, not scalding! Stir in the sugar until it dissolves, then sprinkle your active dry yeast over the top. Give it a gentle swirl and let it sit for about 5-10 minutes. You want to see it get all foamy and bubbly. If it doesn't, your yeast might be dead, or your water was too hot/cold, and honestly, it's best to start over. I've been there, thinking it'll be fine, and ending up with a sad, dense dough.
- Mixing the Dough for Homemade Garlic Knots:
- In a large mixing bowl, whisk together the flour and salt. Make a little well in the center and pour in your activated yeast mixture and the olive oil. Stir with a wooden spoon until a shaggy dough forms. Then, turn it out onto a lightly floured surface and knead for about 5-7 minutes. It should feel smooth and elastic, not sticky. I always find this part so therapeutic, though sometimes my counter ends up looking like a flour explosion!
- First Rise:
- Lightly oil a clean bowl. Place your dough ball in it, turning once to coat. Cover the bowl with plastic wrap or a clean kitchen towel and let it rise in a warm spot for about 1 to 1.5 hours, or until it's doubled in size. This is where the magic happens, folks! I usually put mine near a sunny window or in a slightly warm (but off!) oven. Patience is key here, don't rush it, or your homemade garlic knots won't be as fluffy.
- Shaping Your Garlic Knots:
- Gently punch down the risen dough to release the air. Turn it out onto a lightly floured surface. Roll the dough into a roughly 12x8-inch rectangle. Using a pizza cutter or sharp knife, cut the dough into 1-inch wide strips. Take each strip and tie it into a loose knot. Don't worry if they're not perfect, mine certainly aren't! Some look like little pretzels, some like actual knots, and that's the charm of homemade garlic knots.
- Second Rise & Bake Prep:
- Arrange the shaped knots on a baking sheet lined with parchment paper, leaving a little space between each. Cover them loosely with plastic wrap or a towel and let them rise again for another 30-45 minutes, or until they look puffy. While they're doing their thing, preheat your oven to 400°F (200°C). This second rise is important for that light, airy texture we're after. I always peek under the towel, hoping for maximum puffiness!
- Baking and Finishing Your Homemade Garlic Knots:
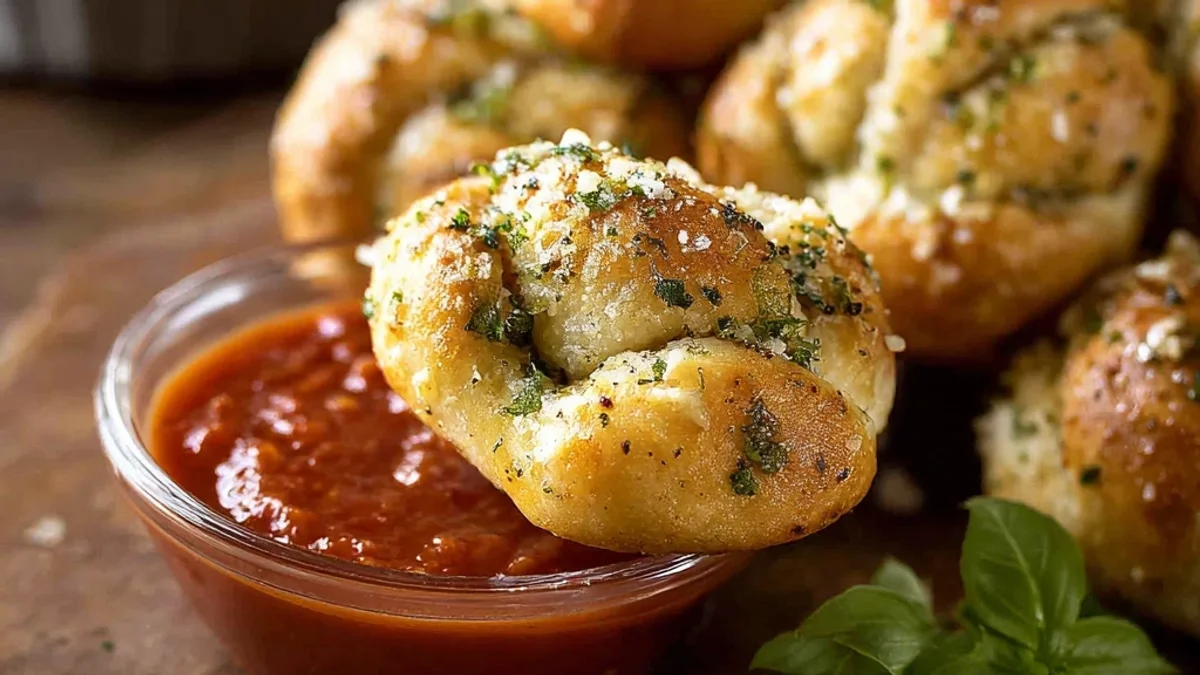
- Bake the knots for 12-15 minutes, or until they're golden brown and smell absolutely incredible. While they're baking, melt the butter in a small saucepan. Stir in the minced garlic, fresh parsley, and Parmesan cheese. Once the knots are out of the oven, immediately brush them generously with the garlic butter mixture. They'll soak up all that garlicky goodness. Serve them warm, and honestly, try not to eat them all yourself!
There was this one time, I was so proud of my perfectly risen dough, only to realize I'd forgotten to add the salt to the flour mixture. The homemade garlic knots looked beautiful, but tasted… well, bland. It was a teachable moment for sure. Now, I have a little mental checklist, and a quick taste of the dough before the first rise is sometimes allowed. It's all part of the kitchen chaos, right?
Storage Tips
These homemade garlic knots are definitely best enjoyed fresh, warm from the oven. Honestly, they rarely last more than a day in my house! If you happen to have leftovers (a rare occurrence!), store them in an airtight container at room temperature for up to 2 days. I've tried refrigerating them, but they tend to dry out a bit. To reheat, pop them in a 350°F (175°C) oven for about 5-7 minutes, or until warmed through. Please, for the love of all that is delicious, don't microwave them! I microwaved them once, and they turned into sad, chewy, rubbery little things. Lesson learned, and now I always opt for the oven to bring back that lovely texture.

Homemade Garlic Knots: Ingredient Substitutions
I'm all about using what you have! If you don't have fresh parsley, you can use about 1 tablespoon of dried parsley in the garlic butter, though honestly, fresh is just so much brighter. I once tried using dried garlic powder in the butter when I was out of fresh, and it worked in a pinch, kinda. But the flavor isn't as vibrant or pungent. For the cheese, nutritional yeast can be a decent dairy-free alternative if you're looking to avoid Parmesan, and it still gives a savory, cheesy note. You could also swap out some of the all-purpose flour for whole wheat flour for a slightly nuttier flavor, but start with replacing only a quarter of the AP flour, as it can make the dough a bit denser.
Homemade Garlic Knots: Serving Suggestions
These homemade garlic knots are incredibly versatile! Of course, they're the ultimate sidekick to any Italian meal think a big bowl of spaghetti and meatballs, a creamy lasagna, or a hearty minestrone soup. But don't stop there! I love serving them with a simple green salad for a lighter meal, or alongside a charcuterie board for an appetizer that everyone swoons over. For a cozy night in, a plate of these garlic knots, a big bowl of marinara for dipping, and a good rom-com? Yes please. They also pair beautifully with a crisp white wine or a light-bodied red. Seriously, they disappear fast, no matter what you serve them with!
The Story Behind These Garlic Knots
Garlic knots, as we know them, are a quintessential Italian-American creation, born from the tradition of not wasting any dough in pizzerias. Leftover pizza dough scraps would be twisted, baked, and then drenched in a garlicky, herby oil. For me, they connect to countless family gatherings. My Nonna, who never wasted a thing, would have loved the ingenuity. While she made more traditional Italian breads, the spirit of using every bit and making something delicious with simple ingredients really resonates. These homemade garlic knots aren't just a snack, they're a nod to resourcefulness and the delicious legacy of immigrant kitchens making magic with what they had.
Making these homemade garlic knots always fills my kitchen with the most incredible aroma, a scent that just screams comfort and happiness. It's a little bit of work, but seeing those golden, fragrant knots emerge from the oven, ready for a generous brush of herb butter, is just so satisfying. I hope you love them as much as I do, and maybe they'll create some happy, messy memories in your kitchen too. Let me know how your knots turn out!

Frequently Asked Questions
- → Why didn't my homemade garlic knots dough rise?
Most likely, your yeast wasn't active! Either your water was too hot and killed it, or too cold and it stayed dormant. Always proof your yeast first to make sure it's bubbly and alive before mixing it with flour.
- → Can I use dried garlic or herbs for these garlic knots?
You can, but fresh is genuinely better for that vibrant flavor. If you must use dried, use about 1/3 the amount of fresh, as dried herbs are more potent. I've done it, and it works, but it's not quite the same pop.
- → My homemade garlic knots are too dense. What went wrong?
This often happens if the dough wasn't kneaded enough, or if it didn't get enough time for both rises. Also, too much flour can make them dense. Trust the dough, let it get nice and puffy!
- → How do I store leftover garlic knots?
Keep them in an airtight container at room temperature for a day or two. Reheat them in a warm oven (around 350°F/175°C) for a few minutes to bring back their softness. Seriously, avoid the microwave!
- → Can I add cheese to the dough for a cheesy garlic knot?
Oh, absolutely! I've added shredded mozzarella or provolone to the dough before the first rise, and it makes them extra gooey and delicious. A little sprinkle of Parmesan in the dough works too!