

I remember the first time I stumbled upon a truly great roadhouse chicken dish. It was late, we were on a cross-country trip, and I was starving. The plate arrived, sizzling, drowned in this incredible garlic butter sauce. Honestly, I didn't expect that much from a roadside diner, but wow. It stuck with me. For years, I tried to recreate that magic at home, sometimes with disastrous results once I nearly set off the smoke alarm trying to get that perfect sear, oops! This Garlic Butter Chicken Skillet is my homage to that memory, minus the smoke alarm drama.
The first time I nailed this Garlic Butter Chicken Skillet, I had my sister over. She’s a tough critic, you know? I was so focused on the sauce, I almost forgot to season the chicken properly. A quick dash of salt and pepper right before it hit the pan saved me! We ended up scraping every last bit of sauce from the skillet. That’s when I knew I had something special, something that really brought that roadhouse vibe right into my own kitchen.
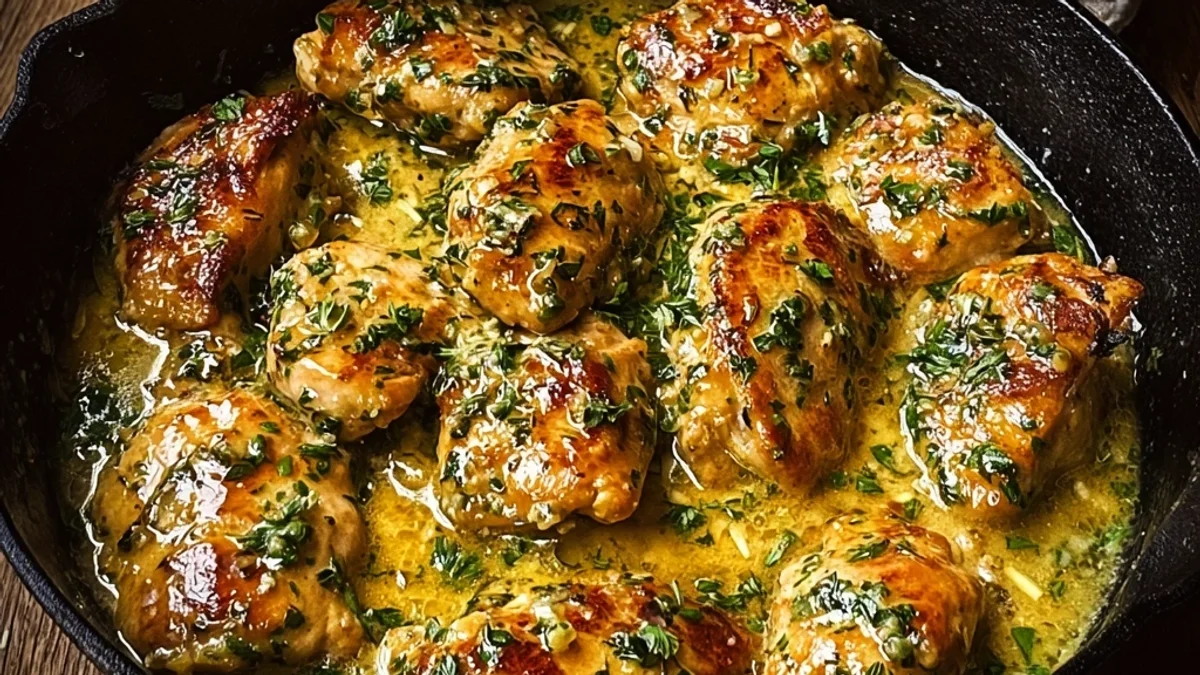
Ingredients for Garlic Butter Chicken Skillet
- Boneless, Skinless Chicken Thighs: These are the skillet stars, hon! Thighs stay so much juicier and more flavorful than breasts, especially when you're searing them. Don't even think about using skim milk for the sauce, and for the chicken, trust me on the thighs.
- Unsalted Butter: We need butter, lots of it, for that rich, luscious sauce. Using unsalted means we control the salt content ourselves. I once used salted butter and everything was way too salty, total kitchen disaster, so now I'm super careful.
- Fresh Garlic: This is non-negotiable! Loads of fresh garlic, minced finely. I tried garlic powder once, and it just didn’t give that pungent, aromatic punch this dish needs. More garlic is always better, in my humble opinion!
- Chicken Broth: Adds depth and helps build that incredible sauce. I usually keep a good quality low-sodium broth on hand, so I can adjust seasoning later. It's the liquid backbone of the sauce, you know?
- Heavy Cream: This is where the magic happens for that creamy, decadent finish. Don't use skim milk, just don't. It won't give you the same luxurious texture. I've tried it, and it just watered everything down, kinda sad.
- Fresh Parsley: A pop of green and freshness at the end. It brightens everything up and makes the dish look fancy, even when it’s just a simple weeknight meal. I love the smell of fresh parsley as I chop it, it just feels right.
- Lemon Juice: A squeeze of fresh lemon juice at the end cuts through the richness of the butter and cream. It's that little something extra that makes you go, "Mmm!" I always keep a lemon in the fridge for moments like these.
- Salt & Black Pepper: Essential for seasoning the chicken and balancing the sauce. Season generously! I always taste and adjust, sometimes I go a little heavy on the pepper, because I like that kick.
Creating Your Garlic Butter Chicken Skillet
- Prep the Chicken:
- First things first, pat those chicken thighs super dry with paper towels. This step is crucial for getting that beautiful sear, seriously! Then, slice each thigh into 1-inch pieces. Season them generously with salt and black pepper. I always make sure they’re well-coated because that’s where the flavor really starts. Don't skimp on this part, or your skillet meal will be missing something.
- Sear the Chicken:
- Heat a large oven-safe skillet (cast iron is my favorite for this, hon!) over medium-high heat. Add a tablespoon of olive oil. Once shimmering, add the chicken pieces in a single layer, making sure not to overcrowd the pan. Work in batches if you need to! Sear for 3-4 minutes per side until golden brown and cooked through. This is where I always get distracted by the amazing smell, but try to stay focused for that perfect crust!
- Make the Garlic Butter:
- Remove the cooked chicken from the skillet and set aside. Reduce the heat to medium. Add the butter to the skillet, letting it melt. Then, toss in that glorious minced garlic. Sauté for about 1 minute, until it’s fragrant and lightly golden. Be careful not to burn it burned garlic is a sad, bitter affair, and I've made that mistake more times than I care to admit!
- Build the Sauce:
- Pour in the chicken broth and bring it to a gentle simmer, scraping up any browned bits from the bottom of the pan. Those little bits are packed with flavor, so don't leave them behind! Let it reduce slightly for about 2-3 minutes. This step is key for a rich, flavorful sauce for your dish.
- Add Cream & Finish:
- Stir in the heavy cream and bring the sauce back to a gentle simmer. Let it cook for another 2-3 minutes, allowing it to thicken slightly. The sauce should coat the back of a spoon. Return the cooked chicken to the skillet, tossing it to coat evenly. Oh, the smell at this point is just heavenly, honestly!
- Garnish & Serve:
- Remove the skillet from the heat. Stir in the fresh lemon juice and sprinkle generously with fresh parsley. Give it a final taste and adjust seasoning if needed. The finished dish should be glistening, fragrant, and utterly comforting. Serve immediately, perhaps with a side to soak up all that amazing sauce!
I remember one chaotic Tuesday night, trying to whip up this dish after a long day. My kitchen was a mess, and I was convinced I’d forgotten an ingredient. Turns out, I just needed to breathe and trust the process! The aroma of garlic and butter slowly filled the room, and all the day's stress just melted away. It really is a comforting meal to make, even when things feel a bit messy.
Storing Your Garlic Butter Chicken Skillet
Okay, so you've got leftovers of this glorious skillet meal? Lucky you! Let it cool completely before transferring it to an airtight container. It'll keep beautifully in the fridge for up to 3 days. Now, for reheating, here’s my personal advice: don't just zap it in the microwave. I microwaved it once, and the sauce separated it was a sad, oily mess, so don't do that lol. Instead, gently reheat it in a skillet over low heat on the stovetop. If the sauce looks a little thick, add a splash of chicken broth or even a tiny bit of cream to bring it back to life. It holds up surprisingly well, especially those juicy chicken thighs!

Garlic Butter Chicken Skillet: Ingredient Substitutions
Life happens, and sometimes you don’t have exactly what the recipe calls for. For the chicken, boneless, skinless chicken breasts can work, but watch them closely! They dry out faster, so I’d recommend brining them first or cutting them into slightly larger pieces. I tried it once, and it worked... kinda, but the thighs are still king for this dish. No fresh garlic? Garlic powder is a last resort, use about 1 teaspoon per clove. It won't be the same, but it'll get you by. For the heavy cream, whole milk mixed with a teaspoon of cornstarch can thicken a bit, but the richness won't be there. I tried that when I was out of cream, and while it was edible, it lacked that decadent mouthfeel. Experiment and see what works for your pantry!
Serving Your Roadhouse Chicken Skillet
Oh, the possibilities! This dish is practically begging for something to soak up all that incredible sauce. My absolute favorite is creamy mashed potatoes it's just pure comfort. But honestly, egg noodles, fluffy white rice, or even a crusty baguette are fantastic choices. For veggies, I love a simple steamed green bean or asparagus, maybe roasted broccoli for a little char. And for a drink? A crisp white wine or even just a cold sparkling water with lemon pairs beautifully. This dish and a good rom-com? Yes please! It’s perfect for a cozy night in, or even a casual date night. It just feels special.
The Story Behind This Roadhouse Chicken Skillet
While this particular skillet recipe is my own spin, the concept of a pan-seared chicken bathed in a rich, flavorful sauce has roots in countless comfort food traditions around the world. Think of French Coq au Vin, Italian Chicken Scarpariello, or even American diner classics. My inspiration, as I mentioned, came from a memorable roadhouse meal, a simple dish that delivered big flavor. It's about taking humble ingredients and transforming them into something truly satisfying. For me, it became a go-to when I wanted that feeling of a hearty, flavorful meal without all the fuss. It's my little piece of culinary nostalgia, reinvented for my kitchen.
So there you have it, my take on a truly comforting skillet meal. It's a dish that brings back good memories and makes new ones, all while filling your kitchen with the most amazing aromas. Honestly, it’s one of those recipes I turn to when I need a little kitchen hug. I hope you give it a try and maybe even add your own little quirks. Let me know how your version turns out!

Frequently Asked Questions About This Skillet Recipe
- → Can I use chicken breasts for this recipe?
You can, but I highly recommend thighs for their juiciness! If you use breasts, cut them into similar-sized pieces and be careful not to overcook them, or they'll get dry. I tried it once, and they needed a bit more sauce to stay moist.
- → What if I don't have heavy cream for the sauce?
Heavy cream gives the best richness, but you could try half-and-half or even whole milk with a teaspoon of cornstarch mixed in. The sauce won't be as thick or luxurious, but it'll still be tasty. I've been there, gotta make do!
- → How do I get a good sear on the chicken?
The secret is patting the chicken super dry before it hits a hot skillet with a little oil. Don't overcrowd the pan, work in batches if you need to! If you put too much chicken in, it steams instead of searing, which I learned the hard way with a sad, pale batch.
- → How long does this skillet meal last in the fridge?
This skillet meal keeps well in an airtight container in the fridge for up to 3 days. Just remember my reheating tip: stovetop is better than microwave to keep that sauce from separating. Trust me on this one!
- → Can I add vegetables to this dish?
Absolutely! I often toss in some spinach at the very end, right before serving, or sauté mushrooms with the garlic. Broccoli florets added during the last few minutes of simmering also work beautifully. Get creative, it's your kitchen!