

Honestly, I remember the first time I ever tasted a chimichanga. It was at this tiny, unassuming Mexican joint, and one bite of that crispy, savory goodness? My world changed! I came home that night, fueled by pure culinary ambition (and maybe a little too much salsa), determined to recreate that magic in my own kitchen. And oh boy, did I have some epic fails! My first attempt at Crispy Beef Chimichangas was a soggy, sad mess. The second? A little too… charred. But these Crispy Beef Chimichangas? They’re the culmination of years of messy experiments, a recipe that finally hits that perfect sweet spot of crunchy outside and juicy, intensely flavorful beef filling. It’s a labor of love, to be real, but the reward is so, so worth it. This dish just screams comfort, perfect for those nights when you need a big, warm, crispy hug!
Oh, the time I tried to flip one of these beauties with a flimsy plastic spatula! It was a total kitchen disaster, filling everywhere. My dog thought it was a treat, bless her heart. I just stood there, flour on my nose, laughing at the sheer chaos. Now, I always use proper metal tongs, and honestly, it makes all the difference. Sometimes, you just gotta learn the hard way, right?
Crispy Beef Chimichangas: Ingredients
Hearty Filling Essentials
- Ground Beef: I always go for 80/20 lean, honestly. You need a little fat for flavor, don't skimp! It makes the filling rich and juicy.
- Onion: The unsung hero of almost every savory dish. It adds a subtle sweetness and depth. I tried making it without once, and it just wasn't the same, kinda flat.
- Garlic: You know me, I always say "more garlic!" It's the soul of the dish, giving that pungent, aromatic kick. Fresh is best, seriously, skip the jarred stuff if you can.
Flavor Powerhouses
- Chili Powder: For that warm, earthy, slightly smoky base. Don't go too heavy if you're sensitive to spice, but it's essential for that classic Tex-Mex vibe.
- Cumin: This spice just screams "Mexican food" to me. It adds an earthy, warm note that ties all the flavors together. A little goes a long way, but it's crucial.
- Smoked Paprika: My secret weapon! It adds a beautiful smoky depth without extra heat. I didn't expect that it would make such a difference, but it really elevates the flavor.
- Beef Broth: Keeps the filling moist and adds another layer of beefy flavor. I've used chicken broth in a pinch, and it works, kinda, but beef broth is superior here.
Chimichanga Wraps & Fry
- Large Flour Tortillas: You need big ones, hon, about 10-inch! Smaller ones are a nightmare to fold without bursting. I learned that after several exploding chimichangas.
- Vegetable Oil: For that glorious, golden crisp! Don't be shy with it, shallow frying is key for these. I once tried to use olive oil, and it smoked up the whole kitchen, oops.
Finishing Touches & Toppings
- Shredded Cheddar Cheese: Melty, savory perfection inside or on top. I love a sharp cheddar, but Monterey Jack works beautifully too.
- Shredded Lettuce: Adds a fresh, cool crunch to balance the richness.
- Salsa: Use your favorite! I often make my own pico de gallo, but a good store-bought one is totally fine.
- Sour Cream: A dollop of cool, tangy sour cream is a must for me. It cuts through the richness so nicely.
Crispy Beef Chimichangas: Instructions
- Step 1: Get That Filling Started!
- First things first, grab your biggest skillet and heat it over medium-high heat. Add your ground beef and break it up with a spoon. You want it to brown nicely, getting all those delicious bits crispy. Honestly, I always forget to preheat the pan properly, and then it takes forever to brown. Don't be like me! Cook until no pink remains, then drain off any excess fat. You don't want a greasy chimichanga, trust me.
- Step 2: Build Those Flavors, Baby!
- Reduce the heat to medium. Toss in your chopped onion and cook until it's softened, about 5-7 minutes. Then, add your minced garlic, chili powder, cumin, and smoked paprika. Stir it all together and let those spices get fragrant for about a minute oh, the smell is incredible! This is where the magic really starts to happen, creating that deep, complex flavor. Don't rush this step, letting the spices toast a bit is key.
- Step 3: Simmer to Perfection
- Pour in the beef broth and bring the mixture to a gentle simmer. Let it cook, stirring occasionally, until most of the liquid has evaporated and the filling is thick and saucy, about 8-10 minutes. This ensures your filling isn't watery, which would make your chimichangas soggy, and nobody wants that! Taste it here, and adjust salt and pepper if needed. I always add a little extra salt, but that's just me!
- Step 4: Wrap 'Em Up Tight!
- Warm your flour tortillas slightly in the microwave or a dry skillet this makes them more pliable and less likely to crack when you roll them. Spoon about 1/2 to 3/4 cup of the beef filling down the center of each tortilla, then sprinkle with a little shredded cheese. Fold in the sides, then roll it up tightly from the bottom. Don't overfill, or they'll burst when you fry them! I learned that the hard way, with beef exploding everywhere, oops.
- Step 5: Fry to Golden Glory!
- Heat about 1-2 inches of vegetable oil in a deep skillet or Dutch oven over medium-high heat to about 350°F (175°C). Carefully place 1-2 chimichangas seam-side down into the hot oil. Fry for 2-3 minutes per side, until they're beautifully golden brown and crispy. This is where the magic happens! Don't overcrowd the pan, or the oil temperature will drop, and your chimichangas won't get crispy. I always try to squeeze one more in, but it never works out well!
- Step 6: Serve 'Em Up Hot!
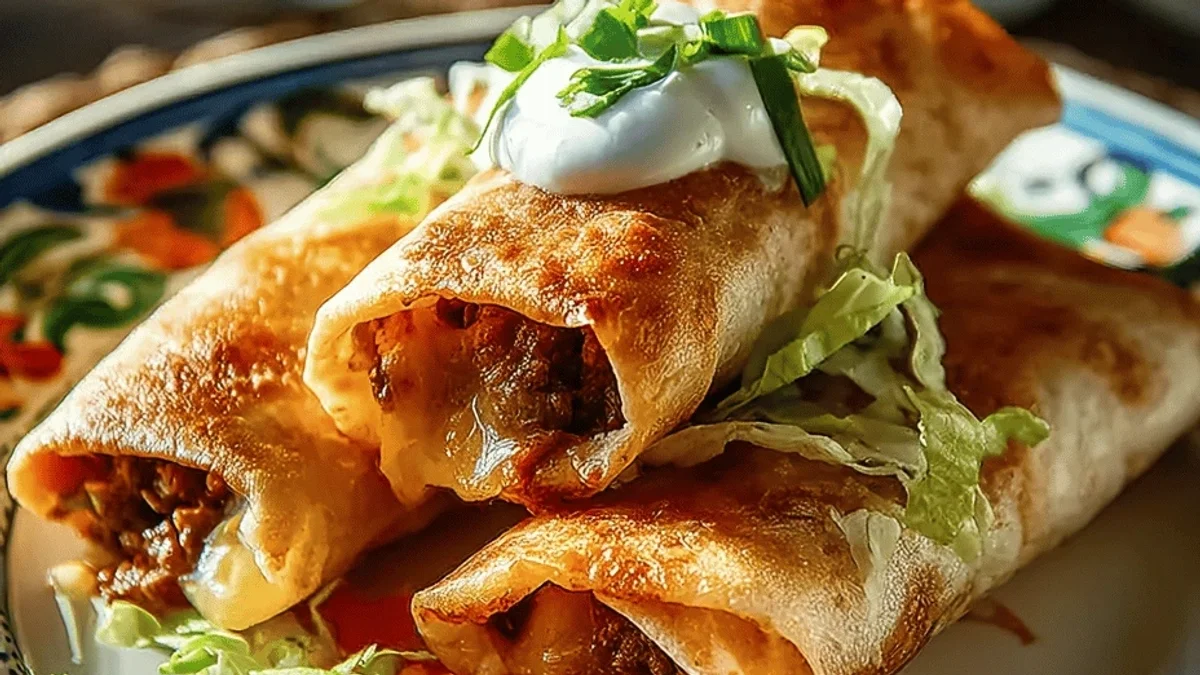
- Once golden and crispy, carefully remove the chimichangas from the oil with tongs and place them on a wire rack set over a paper towel-lined baking sheet to drain any excess oil. Let them cool for just a minute before serving. The final result should be wonderfully crunchy on the outside, and the filling should be bubbling hot and savory. Pile on your favorite toppings lettuce, salsa, sour cream, extra cheese! They look, smell, and taste amazing!
Honestly, one time I was so proud of my perfectly fried chimichangas, I completely forgot to put a plate underneath when I took them out of the oil. They crashed onto the counter, right next to my phone, sending little bits of crispy tortilla flying. A moment of silence for those fallen heroes. Cleanup was… a journey. But hey, it happens in a real kitchen, right? That's just part of the fun!
Making Crispy Beef Chimichangas: Storage Tips
Okay, so these are definitely best enjoyed fresh, when they're at their peak crispy glory. The crispiness does fade a bit, honestly, with time. If you have leftovers (which is rare in my house!), let them cool completely, then store them in an airtight container in the fridge for up to 3 days. Reheating them in an air fryer at 350°F (175°C) for about 8-10 minutes is your best bet for getting some of that crispness back. I microwaved them once, and the tortilla got a bit chewy and the sauce separated so don't do that lol. They’re fine, but not the same. For the filling, you can make that ahead and store it for a few days, making assembly super quick later!

Ingredient Substitutions
I've played around with a few things over the years. If you're not a beef person, ground chicken or turkey works for the filling, but honestly, the flavor profile is a bit lighter, less rich. I tried pinto beans once instead of meat for a vegetarian friend, and it was... okay, kinda. It didn't have that same hearty, satisfying feel. As for cheese, Monterey Jack or even a spicy pepper jack is fantastic if you like a little extra kick. Sometimes I throw in a can of drained black beans to the beef mixture for extra texture and fiber. Don't be afraid to experiment, that's how I found my favorite version of these!
Serving Crispy Beef Chimichangas Right
Oh, the serving possibilities! A big plate of Crispy Beef Chimichangas with a generous dollop of homemade guacamole and some fresh pico de gallo? Yes please! I also love serving these with a simple side of Mexican rice or some refried beans. For drinks, a cold Mexican lager or even a refreshing limeade would be perfect. And for a cozy night, these chimichangas and a good rom-com are my ideal pairing. Sometimes, I even add a drizzle of a spicy queso over the top, just to be extra. It's all about making it feel special for you!
The Story Behind Crispy Beef Chimichangas
You know, the history of the chimichanga is such a fun one! It's widely believed to have originated in the Southwest U.S., possibly in Arizona, from what sounds like a happy accident. Legend has it a burrito accidentally fell into a deep fryer. I just love that! It reminds me that some of the best culinary creations come from kitchen "oops" moments, just like some of my own cooking adventures. My journey with these Crispy Beef Chimichangas feels a bit like that a happy accident of perseverance, a lot of messy learning, and finally, a dish that brings so much joy to my table. It's a testament to embracing those kitchen mishaps!
After all the trials, triumphs, and yes, a few messes, these Crispy Beef Chimichangas are more than just a recipe to me, they're a little piece of my heart on a plate. The crunch, the savory beef, the fresh toppings it just feels so right, so comforting. I hope you make them, make a mess (it's okay!), and make some wonderful memories of your own. Let me know how your chimichanga adventure goes, I love hearing about your kitchen chaos!

Crispy Beef Chimichangas FAQs
- → Can I bake these Crispy Beef Chimichangas instead of frying?
You totally can, honestly, but they won't be quite as crispy. Brush them with oil and bake at 400°F (200°C) for about 20-25 minutes, flipping halfway. I tried it once, and they were good, just not the same satisfying crunch!
- → What kind of tortillas work best for beef chimichangas?
Large, soft flour tortillas are your best bet, around 10 inches. Corn tortillas tend to break when rolled and fried, which I learned from a very messy experience. Medium ones work in a pinch, but they're harder to fill without bursting.
- → My chimichangas are falling apart when I fry them! Help!
Oh, I've been there! Make sure you don't overfill them, and roll them tightly. Also, don't rush the frying, let the seam side cook first to seal it. Mine still sometimes have a little blowout, honestly, it's part of the charm!
- → Can I make the beef filling for Crispy Beef Chimichangas ahead of time?
Yes, totally! This is a lifesaver for busy nights. Cook the filling, let it cool completely, then store it in an airtight container in the fridge for up to 3 days. It makes assembly so much faster, which I always appreciate!
- → What are some fun variations for these chimichangas?
You could add some diced bell peppers to the filling, or a pinch of cayenne for more heat. Sometimes I throw in a can of drained black beans for extra bulk and texture. Experiment! That's what cooking is all about, finding what you love.